How To Change The Name Of Your Facebook Account
There can be various reasons why you may want to change your name on your Facebook account. Some of the common reasons include marriage, divorce, or name change. Regardless of the reason, Facebook allows you to change your account name. Plus, you can add a name like a nickname, maiden name, or birth name.
However, there are some rules and policies that need to be followed to change your name on the platform. In this guide, we will provide the details you need to know.
Changing Your Name On Facebook From Mobile App
The majority of people access Facebook using the mobile app, which is compatible with both iOS and Android platforms. If you feel like changing the name of your Facebook account, you can easily do it from the mobile app. Since the steps have changed quite a bit in recent times, we have detailed the process below.
Here’s how:
- The first thing you need to do is open the Facebook app on your mobile phone.
- Log into your Facebook account using your credentials.
- After logging in, go to the hamburger menu in the bottom right corner of the screen and tap on it.

- Start scrolling down to Settings and Privacy.

- In the Settings and Privacy section, choose Settings.

- Access the Accounts Centre and select See more in Accounts Centre.

- Select the profile you want to change the name for and choose Name.

- Now type in the name you want in the required boxes.

- You can preview the name change by pressing the Review Change option.

- After you are satisfied, tap on the Save Changes button. This will change your name on Facebook.

- You may have to log into your account using your credentials after a name change.
Steps To Change Your Name On Facebook From Desktop Browser
You can also change your account name on Facebook from the desktop browser. The steps are simple and easy to follow. All you have to do is follow the given instructions.
- Launch a web browser of your choice, preferably Google Chrome.
- Visit Facebook from your browser and then access your Facebook profile page.
- In the upper right corner, you will notice a download arrow. Click on it and choose Settings & Privacy.
- Next, select Settings.
- Tap General in the left-hand side menu.
- In the Account Settings section, go to Name, and select Edit.
- Enter the desired name in the required boxes.
- Select the View Name Change option to preview the changes.
- Choose Review Change.
- Re-enter your Facebook password.
- After you are done with the above steps, tap Save Changes.
What You Should Know About Facebook’s Name Change Policy?
Facebook has a clear naming policy that requires users to use the name they commonly go by in everyday life. When you create a Facebook account, you are asked to enter the name you identify with. This could be your legal name or a variation. If your name is unique or unusual, Facebook might ask for official identification, such as a passport, or driver’s license to verify it.
There are also specific rules for profile names. Facebook doesn’t allow unusual symbols, titles, numbers, or any suggestive or offensive words in your profile name. These rules are introduced to protect users from being targeted by imposters. It is also helpful in protecting people from falling victim to online scams and cyber-attacks.
However, Facebook is flexible with nicknames or additional names like a birth name, or maiden name. You can add these to your profile if you want, following the steps we discussed in the above section.
Can You Add Another Name To Your Facebook Account?
Adding another name to your Facebook account is a straightforward process. This option is useful if you want to display a different name, such as a maiden name, nickname, or birth name alongside your official name.
If you choose to add another name to your Facebook account, you will have to confirm your identity. This requires you to present an official document. The additional name will be displayed in a lighter font, right next to your main profile name.
However, it's important to be cautious about sharing too much personal information on your profile as this could increase the risks of scams.
How To Add A Name To Your Facebook Account?
You can add a name to your Facebook account from both desktop and mobile phones. To help you out, we have explained the steps for both device types.
On a computer:
To add a name to your Facebook account from your computer, follow these steps:
- Log into your Facebook account and click on your profile picture.
- Select About and then Details about you.
- Go to the Other Names section and choose the “Add a nickname, birth name” option.
- Locate Name Type and select the type of name you want to add.
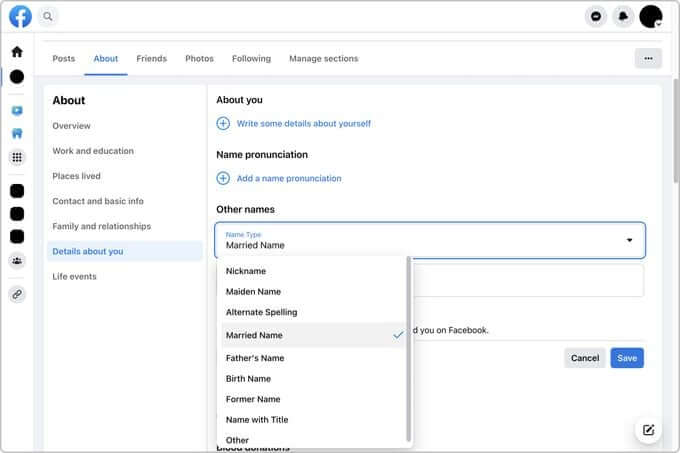
- Enter the desired additional name in the required box.
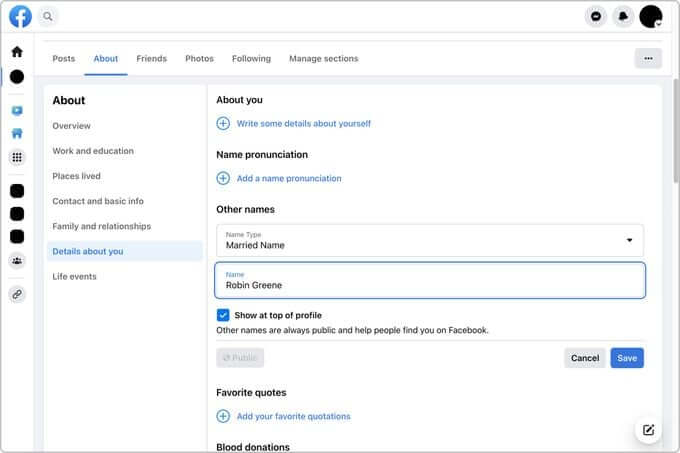
- If you want this name to appear next to your full name at the top of your profile, select the box next to “Show at top of profile.”
- After you are done, hit the Save button.
On a mobile device:
Here’s how you can add a name to your Facebook account from your mobile phone:
- Start by opening the Facebook app on your phone.
- Log into your Facebook account.
- Go to the Menu icon located at the lower right corner of the screen for iPhone users. For Android users, you will notice the icon at the top-right corner.
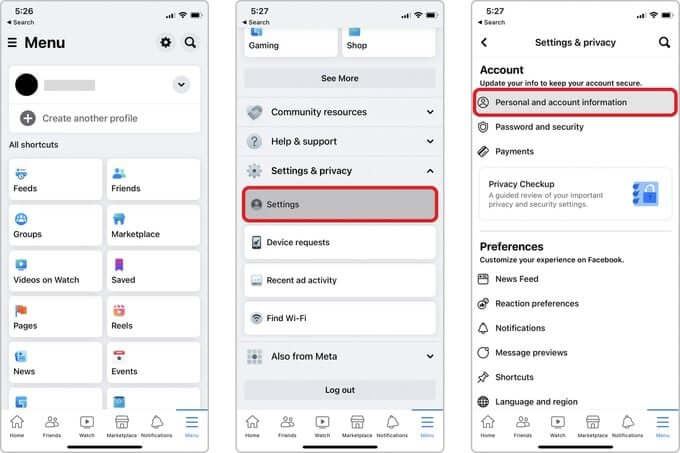
- Choose the Settings & Privacy option.
- Select Settings, and then Personal Information, followed by Name.
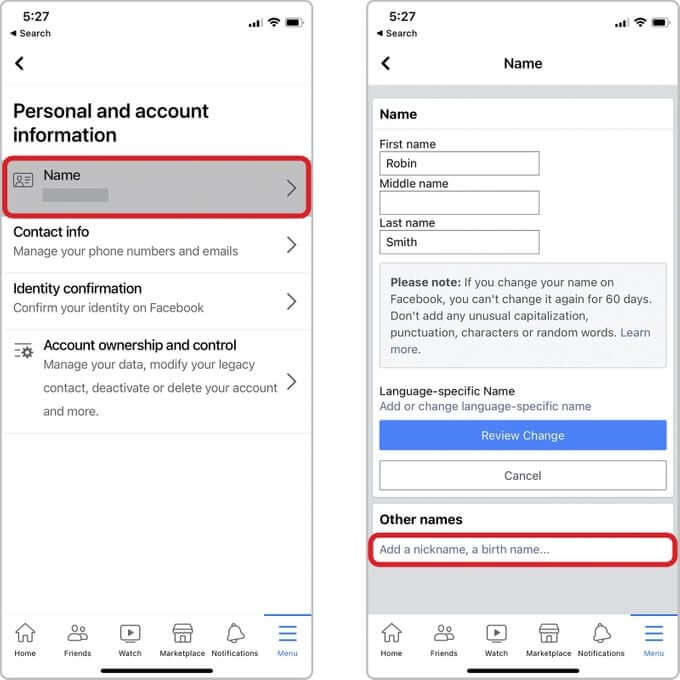
- Click on “Add a nickname, birth name.”
- Select a name type from the available drop-down menu.
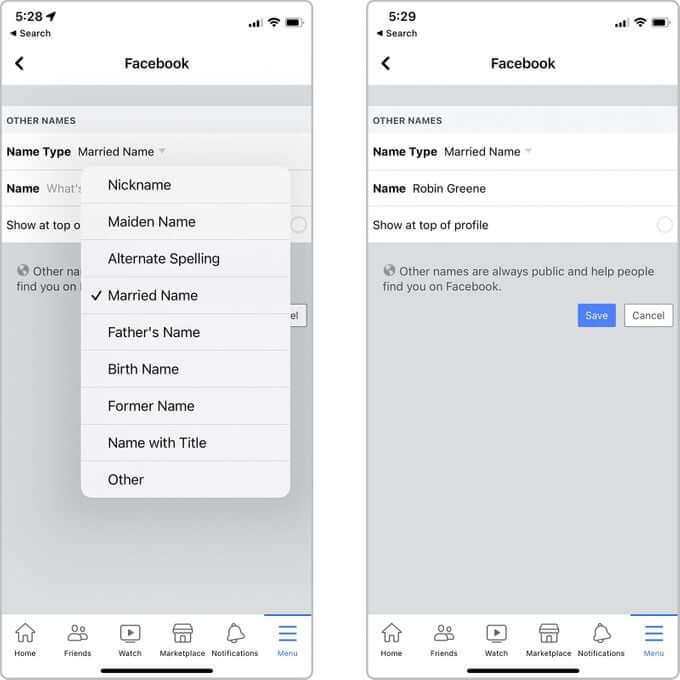
- Type in the desired name in the required box and select the Save button.
Final Words
As you can see, changing your account name on Facebook is not a big deal. Just follow the steps as given and it’s done. If Facebook asks to verify your identity, make sure you have the required documents handy.
